
Bam! Pow! Zap! We (Annelie & Niki) wanted to create fun, real-life superhero action sounds to bring out the superhero in each of us.
So we set about creating a movement-responsive wristbands that produces sound and light effects.
Introducing the SUPERHERO ACTION BAND!
The hardest part was discovering the X-Y-Z access thresholds for the gestures that trigger the sound. We have three unique gesture sets that trigger three different sounds. Part of the fun is finding those gestures and discovering the sounds we programmed. We prepared this tutorial for all the superhero makers out there to make your own!
What You Will Need
Adafruit Flora Accelerometer Piezo Li-po Battery A NeoPixel A Headband Conductive Thread Solder and Soldering Iron Lasercut personalized plexiglasslibrary.

The Process
Step #1 Laser cut the plexiglass
Here is a link to the PDF file of the bat that we created in Illustrator which you can use to Laser cut your own.
Step #2: Fitting the headband to your wrist
Take the headband and put it around your wrist. Make sure you mark where it fits you with a sewing needle or push pin. Take it off you wrist and turn it inside out to sew it closed. Make sure you leave a little room for your flora board to fit inside.
Step #3: Get the Flora up and running
First you need to download the program for the Flora from Adafruit and install it on your computer. Their website has pretty detailed instructions on how to do this.
Step #4: Downloading the code
Next you will download the code from github and unzip it in your Arduino folder. Make sure that that the musical_notes.h file is in the same project folder as the superhero_wrist.ino file and that they appear as below when you open the file.
After you have opened the code in the Adafruit Arduino interface, select the Flora board. Next you will start assembling the circuit.

Step #5: Sewing the accelerometer to the wristband and the Flora

Unplug the flora from your computer. Then sew the accelerometer to the flora as shown with conductive thread. Sew it to the outside of the headband, near the seam you created when you adjusted the fit to your wrist. Make sure that the thread is snuggly wrapped around each hole about three times.
Step #6: Sewing the Neopixel to the wristband and the Flora
Turn your bracelet around to the side away form the seam. This will be the front side of the wristband where you will affix the Neopixel and the plexiglass icon. Sew the Neopixel as shown onto the headband to the Flora.

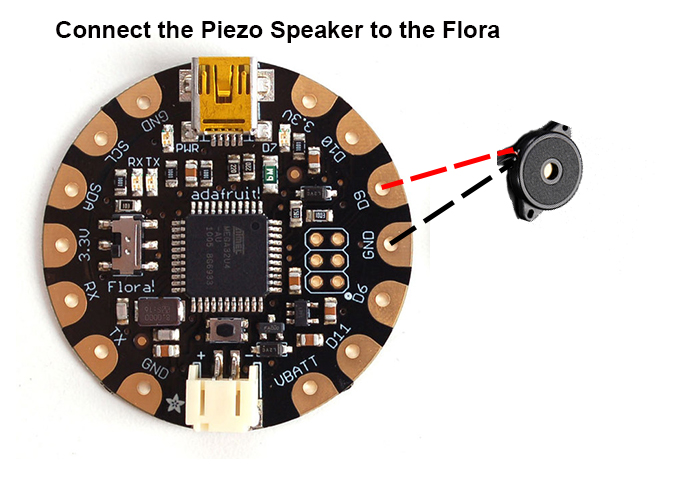
Step #7: Soldiering and sewing the Piezo to the Flora
Now you will soldier the piezo speaker to the flora board. The positive (red) wire will connect to the D9 loop on the Flora. The Negative (black) wire will connect to the GND loop on the Flora. Once it is soldered, you will sew it to the wristband using the two loops on the piezo.

Step #8 Attach the icon to the wristband
Attach the laser cut icons to a store-bought headbands that we sewed to fit your wrist. Make sure to place them in the center.
Step #9 Attach the battery to the Flora and watch the wristband go!
